Rust in Detail, Part 2
Part 2: Sending and Receiving Messages
In this series of articles we’ll follow the process of creating a scalable, real-time chat service — everything in excruciating detail, of course! The objective is to learn more about system APIs and the emerging language Rust on a practical (and not too contrived) example, going step by step.
The second part takes up where the part one left off and continues with the WebSocket protocol implementation. If you haven’t read the first part yet, it’s better to start there.
Table of Contents
- Data Frames
- Unpacking Header
- Byte Order
- Refactoring Handshake
- Implementing Unpacking
- Sending Frames
- Control Frames
- Conclusion
14 Data Frames
We’ve got to the point when we’re ready to receive and send back some real messages. To do that we need to understand how data is encoded in the WebSocket protocol.
The protocol is described by the RFC document, which states that data should be encoded in frames — a kind of containers that consist of a header carrying some meta-information, and a payload (that is, the actual data that we want to send).
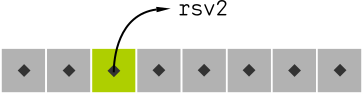
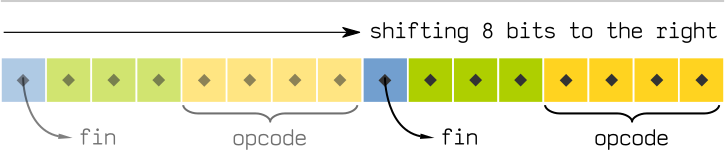
The frame header starts with 2 bytes (or 16 bits) that look like follows:

Each diamond on this diagram represents a single bit (a one or a zero).
finis a marker for an end of a stream of fragmented frames. We won’t cover this topic in detail for now because at this moment we don’t need it, and it’s overly complicated for a task that we’re trying to do.rsv1,rsv2, andrsv3are protocol extensions. We don’t need to touch them, as they’re reserved to be used in future versions of the WebSocket protocol.opcodedetermines which kind of frame we’re receiving or sending — binary or text. Also, there are several types of control frames that are used in cases such as when a user closes a connection or for pings & pongs (we’ll cover it later).maskedis set to 1 (true) when payload bits are masked. More on that later.payload lenis the actual length of the data. It has some special meaning that we’ll cover in a while.
Remember that all this information is packed in only 2 octets (that is, bytes consisting of 8 bits each). Consider this value set (in JSON):
{
  "fin"  : 1,
  "rsv1" : 0,
  "rsv2" : 0,
  "rsv3" : 0,
  "opcode" : 2,
  "masked" : 1,
  "payload_len": 64
}
All these values can also be encoded in binary, as groups of bits:
{
  "fin"  : b1,
  "rsv1" : b0,
  "rsv2" : b0,
  "rsv3" : b0,
  "opcode" : b10,
  "masked" : b1,
  "payload_len": b1000000
}
Or just as a single binary number: 1.0.0.0.0010.1.1000000, or a hexadecimal number: 0x82C0. That’s the way the frame header actually looks when we receive it from the client, so the first thing we need to do is to divide (or unpack) this single number into individual values.
15 Unpacking Header
Now, to break down the binary into parts and extract useful information from the frame we need to apply a technique called bit masking.
It may sound scary, but it’s a basic concept. We just “highlight” the bits we want to extract like follows:

Gray rectangles represent 0’s, and yellow are 1’s, so this diagram corresponds to a bit mask 00001111b.
Similarly, this is a bit mask 00100000b.
We apply the mask with the & (bitwise and) operator as follows: byte & mask.
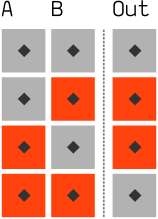
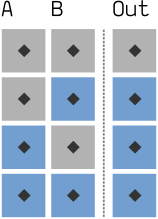
That’s how it works:
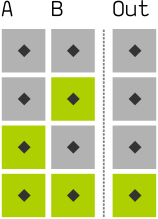
Again, here gray recrangles represent 0s and greens are 1s.
Given two “variables” A = 1b and B = 0b, we’ll get an output of Out = 0b.
The same goes for A = 0b and B = 1b.
Output is Out = 1b only if both inputs contain 1s. It’s that simple.
If we have several bits, the AND operation is applied consequently to each one of them, as follows: A = 101b, B = 011b, and Out = 001b, as the only bit A and B have in common is the third 1b.
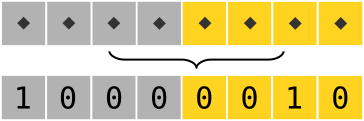
Now, remember the masks from the above, where we “highlighted” bits? We can apply them to the header byte that we’ve received from a client, and we’ll get only the bits that we want as a result!
16 Byte Order
Byte order, or endianness, determines how groups of two or more bytes are ordered in memory. The byte order can be either little-endian or big-endian, as in Swift’s book “Gulliver’s Travels” (from which the name originates).
Let’s consider how they work.
A single word can store a number up to 0xFFFF.
Given a value 0x0001, how do we actually align its two bytes in memory?

The most simple analogy would be writing words on paper. European languages conventionally use left-to-right writing system. That can be compared to big-endian, where the most significant digit goes to the left and least significant digits continue to the right: 1234.
On the other hand, several languages, like Hebrew, Farsi, and Arabic, write words right-to-left. And so is little-endian, where the most significant digit is on the right.
The same concept applies to bytes. The most significant byte would be the byte that contributes more to its value, the higher byte — e.g., consider we have a number 0x2A42. The most significant byte would be 0x2A, because it’s in the “higher” place, so to speak — analogous to thousands or hundreds in decimal.
Here’s how we order it in memory:

The big-endian goes in a “natural” way, the same as we write Arabic numerals: 0x2A42, while the little-endian is reversed: 0x422A.
That’s everything you need to know about this topic! Just try to remember the example with 0x0001, where little-endian always goes as “unnatural” 0x0100.
Now here’s the major thing we need to consider in application to the WebSocket protocol: all data that comes from the network is ordered in big-endian. That’s the convention that’s called network byte order. And here’s another thing: x86 processors use little-endian[1]. That means we need to convert numbers from one order to another. See how it’s complicated? In fact, maybe just a little bit, because the Crates repository already has everything we need.
There we can find a handy library to handle the byte orders in a more straightforward way: byteorder.
How? We’ll see it on an example!
17 Refactoring Handshake
Before we get to the unpacking implementation, let’s do a little warm-up with a slight refactoring of the WebSocketClient struct, as we don’t want our code to become an unintelligible mess. A quick recap: this structure handles clients connections, and the read function gets called each time when a new data from a client arrives.
Let’s move the connection handling code to its own function by renaming the fn read in WebSocketClient to fn read_handshake. Let’s write a completely new read that will be aware of connection states we previously introduced in the “Handshake” section.
fn read(&mut self) {
    match self.state {
        ClientState::AwaitingHandshake => {
            self.read_handshake();
        },
        _ => {}
    }
}
It’s simple - we match on the current value of self.state, and for now we handle only AwaitingHandshake and a match-all case (which is required by the Rust compiler, as the patterns in match should be exhaustive for safety reasons).
And while we’re at it, let’s consider another interesting refactoring that Rust makes easy to do. As you remember, when a new connection is established we’re parsing HTTP headers with a special struct, Parser, which contains the HTTP parser state. The thing is, when a connection transitions to the WebSocket protocol, it doesn’t need to retain the parser state, as it’s not needed at this stage, so freeing memory it occupies would be a good thing to do.
So here’s a neat trick: we just move the parser state to our ClientState enum! Look at the code:
enum ClientState {
    // We've added the parser state variable straight to the enum:
    AwaitingHandshake(RefCell<Parser<HttpParser>>),
    …
}

struct WebSocketClient {
    // And we can safely delete it from the client struct
    headers: Rc<RefCell<HashMap<String, String>>>,
    …
    interest: EventSet,
    …
}

// And we need to modify the initialization code:
impl WebSocketClient {
    fn new(socket: TcpStream) -> WebSocketClient {
        …
        WebSocketClient {
            socket: socket,
            headers: headers.clone(),
            interest: EventSet::readable(),
            state: ClientState::AwaitingHandshake(RefCell::new(Parser::request(HttpParser {
                current_key: None,
                headers: headers.clone()
            })))
        }
    }
}
What are the implications of this move and how is it even possible?
Well, technically, enums are just advanced version of structs. To be even more technically correct, Rust’s enums are in fact ADTs in disguise. ADT stands for algebraic data type, a pattern that can be often found in functional programming languages, and that allows us to define complex (even recursive) data structures solely within the type system. You might remember another couple of structs that use this feature: our old friends Option and Result. There’s no magic in them, and you could have implemented these structs yourself.
So that way Rust’s enums allow us to carry the required state along with the type information itself. The fields of enums are immutable, though, and that’s why we have to use RefCell to add interior mutability.
By containing the parser state within an enum we’ve transferred the ownership of that data to AwaitingHandshake, and that means when the state is changed to e.g. Connected, all memory associated with AwaitingHandshake state will be automatically freed by Rust, and that’s what we’ve been trying to achieve.
Now that we’ve removed http_parser from the client struct, we need to modify read and read_handshake accordingly:
fn read(&mut self) {
    match self.state {
        ClientState::AwaitingHandshake(_) => {
            self.read_handshake();
        },
        _ => {}
    }
}

fn read_handshake(&mut self) {
   let is_upgrade = if let ClientState::AwaitingHandshake(ref parser_state) = self.state {
       let mut parser = parser_state.borrow_mut();
       parser.parse(&buf);
       parser.is_upgrade()
   } else { false };

   if is_upgrade {
       // Change the current state
       self.state = ClientState::HandshakeResponse;
       …
   }
}
In read_handshake we encounter a new expression type, if let:
let is_upgrade = if let ClientState::AwaitingHandshake(ref parser_state) = self.state {
if let is a simplified version of match that can do pattern matching & capturing only on a single pattern, which is more convenient than match for such cases because it doesn’t requires us to enumerate all patterns or add a catch-all case.
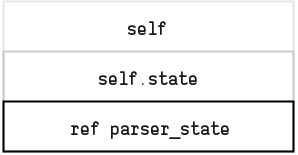
And notice the pattern we match on, particularly ref:
ClientState::AwaitingHandshake(ref parser_state)
We use ref if we want to get a reference to the contained enum value (the parser state in this case). Without ref it’ll look like we attempt to move the ownership of the value (or implicitly clone it). There’s a caveat, though: you might have noticed that we could have matched on that value beforehand, in the read function, e.g.:
match self.state {
    ClientState::AwaitingHandshake(ref parser_state) => {
        self.read_handshake(parser_state);
    },
    …
}
But it would violate the borrow checker rules, and we get this error:
error: cannot borrow `*self` as mutable because `self.state.0` is also borrowed as immutable
       ClientState::AwaitingHandshake(ref parser_state) => self.read_handshake(...),
                                                           ^~~~
While we’re unpacking a ref parser_state contained in the self.state, we also implicitly borrow self to prevent subsequent changes and moves in self.state. The read_handshake function borrows a mutable self instance as well. But, as you already know, Rust allows to have only one mutable borrow per variable. That means that we can borrow self and its properties only within one function. That may look not too convenient, but this way we can be sure that no memory will be corrupted — the borrow checker exists for a reason.
18 Implementing Unpacking
Finally, let’s implement the unpacking of a WebSocket frame header. But before that it’d be a good idea to break the project into modules, as it’s becoming fairly uncomfortable to manage it in a single file. We begin with a module frame.rs, which will contain all frame-related code.
Here’s a full listing of the module (there’s much, but don’t be afraid - we’ll dissect it in a moment):
use std::io;
use std::io::Read;
use std::error::Error;

use byteorder::{ReadBytesExt, BigEndian};

const PAYLOAD_LEN_U16: u8 = 126;
const PAYLOAD_LEN_U64: u8 = 127;

#[derive(Debug, Clone, Copy, PartialEq)]
#[allow(dead_code)]
pub enum OpCode {
    TextFrame = 1,
    BinaryFrame = 2,
    ConnectionClose = 8,
    Ping = 9,
    Pong = 0xA
}

impl OpCode {
    fn from(op: u8) -> Option<OpCode> {
        match op {
            1 => Some(OpCode::TextFrame),
            2 => Some(OpCode::BinaryFrame),
            8 => Some(OpCode::ConnectionClose),
            9 => Some(OpCode::Ping),
            0xA => Some(OpCode::Pong),
            _ => None
        }
    }
}

pub struct WebSocketFrameHeader {
    fin: bool,
    rsv1: bool,
    rsv2: bool,
    rsv3: bool,
    masked: bool,
    opcode: OpCode,
    payload_length: u8
}

pub struct WebSocketFrame {
    header: WebSocketFrameHeader,
    mask: Option<[u8; 4]>,
    pub payload: Vec<u8>
}

impl WebSocketFrame {
    pub fn read<R: Read>(input: &mut R) -> io::Result<WebSocketFrame> {
        let buf = try!(input.read_u16::<BigEndian>());
        let header = Self::parse_header(buf);

        let len = try!(Self::read_length(header.payload_length, input));
        let mask_key = if header.masked {
            let mask = try!(Self::read_mask(input));
            Some(mask)
        } else {
            None
        };
        let mut payload = try!(Self::read_payload(len, input));

        if let Some(mask) = mask_key {
            Self::apply_mask(mask, &mut payload);
        }

        Ok(WebSocketFrame {
            header: header,
            payload: payload,
            mask: mask_key
        })
    }

    pub fn get_opcode(&self) -> OpCode {
        self.header.opcode.clone()
    }

    fn parse_header(buf: u16) -> Result<WebSocketFrameHeader, String> {
        let opcode_num = ((buf >> 8) as u8) & 0x0F;
        let opcode = OpCode::from(opcode_num);

        if let Some(opcode) = opcode {
            Ok(WebSocketFrameHeader {
                fin: (buf >> 8) & 0x80 == 0x80,
                rsv1: (buf >> 8) & 0x40 == 0x40,
                rsv2: (buf >> 8) & 0x20 == 0x20,
                rsv3: (buf >> 8) & 0x10 == 0x10,
                opcode: opcode,

                masked: buf & 0x80 == 0x80,
                payload_length: (buf as u8) & 0x7F,
            })
        } else {
            Err(format!("Invalid opcode: {}", opcode_num))
        }
    }

    fn apply_mask(mask: [u8; 4], bytes: &mut Vec<u8>) {
        for (idx, c) in bytes.iter_mut().enumerate() {
            *c = *c ^ mask[idx % 4];
        }
    }

    fn read_mask<R: Read>(input: &mut R) -> io::Result<[u8; 4]> {
        let mut buf = [0; 4];
        try!(input.read(&mut buf));
        Ok(buf)
    }

    fn read_payload<R: Read>(payload_len: usize, input: &mut R) -> io::Result<Vec<u8>> {
        let mut payload: Vec<u8> = Vec::with_capacity(payload_len);
        payload.extend(iter::repeat(0).take(payload_len));
        try!(input.read(&mut payload));
        Ok(payload)
    }

    fn read_length<R: Read>(payload_len: u8, input: &mut R) -> io::Result<usize> {
        return match payload_len {
            PAYLOAD_LEN_U64 => input.read_u64::<BigEndian>().map(|v| v as usize).map_err(From::from),
            PAYLOAD_LEN_U16 => input.read_u16::<BigEndian>().map(|v| v as usize).map_err(From::from),
            _ => Ok(payload_len as usize) // payload_len < 127
        }
    }
}
The first thing to notice is that now we have to add explicit public declarations that specify structs, variables, constants, and functions that we want to expose as a module’s interface. Other modules will then import them with use frame::{a, b, c};.
Then we introduce a pair of new structures: WebSocketFrameHeader, that will hold the frame header data, and WebSocketFrame to represent incoming and outgoing frames. The latter has an associated function WebSocketFrame.read that can read a frame not only from a socket, but also from any other data source, because we’re accepting an abstract Read trait rather than TcpStream as a function argument. A general rule of thumb is to use interfaces/traits instead of concrete implementations. It’ll come in handy when we’ll be writing unit tests, and because tests is a necessary ingredient for quality code, you might want to use it wherever you can.
Reading Header
We need some point to go from, and we begin with unpacking the header bits:
fn parse_header(buf: [u8; 2]) -> WebSocketFrameHeader {
    let opcode_num = ((buf >> 8) as u8) & 0x0F;
    let opcode = OpCode::from(opcode_num);

    if let Some(opcode) = opcode {
        Ok(WebSocketFrameHeader {
            fin: (buf >> 8) & 0x80 == 0x80,
            rsv1: (buf >> 8) & 0x40 == 0x40,
            rsv2: (buf >> 8) & 0x20 == 0x20,
            rsv3: (buf >> 8) & 0x10 == 0x10,
            opcode: opcode,

            masked: buf & 0x80 == 0x80,
            payload_length: (buf as u8) & 0x7F,
        })
    } else {
        Err(format!("Invalid opcode: {}", opcode_num))
    }
}
Let’s try to understand what’s going on here.
In addition to the bitwise & (AND), we use the right shift operation — >>.
The concept is even simpler than the bitwise and. It works as follows:
That is, we move a certain number of bits from the left to the right, just to make it easier to use bit masks.
let opcode_num = ((buf >> 8) as u8) & 0x0F;
Here we shift the 8 most significant header bits to the right and apply the mask we’ve seen earlier:
It goes further exactly the same way, but for different parts of the header, with different corresponding masks.
Then we create an OpCode enum instance based on the opcode number:
let opcode = OpCode::from(opcode_num);
We should always use enums in such cases because of the type safety. It’s too error-prone to rely on untyped numbers and constants, because this way it would be possible for opcode_num to have an undefined value.
Besides, we can associate enums with their opcode numbers so that they can be casted to integers:
pub enum OpCode {
    TextFrame = 1,
    BinaryFrame = 2,
    …
}
And we use a function to cast a raw number to an according enum instance:
impl OpCode {
    fn from(op: u8) -> Option<OpCode> {
        match op {
            1 => Some(OpCode::TextFrame),
            2 => Some(OpCode::BinaryFrame),
            …
            _ => None
        }
    }
}
Notice that it’s completely safe: the function returns a value of a type Option<OpCode>, so for undefined opcodes it’ll just return a None value.
Payload Length
The next thing we need to do is to determine the full length of the frame. payload_len is 7 bits long, so its maximal value is 127, and as frames can be much bigger than that, we need to apply a special logic defined in the WebSocket RFC:
The length of the "Payload data", in bytes: if 0-125, that is the payload length. If 126, the following 2 bytes interpreted as a 16-bit unsigned integer are the payload length. If 127, the following 8 bytes interpreted as a 64-bit unsigned integer (the most significant bit MUST be 0) are the payload length.
I.e., we should read a u16 if payload_len equals 126, and a u64 if it’s 127. But let’s not rely on these magical values and introduce a couple of constants with descriptive names:
const PAYLOAD_LEN_U16: u8 = 126;
const PAYLOAD_LEN_U64: u8 = 127;
And then write a separate function to read the payload length:
fn read_length<R: Read>(payload_len: u8, input: &mut R) -> io::Result<usize> {
    return match payload_len {
        PAYLOAD_LEN_U64 => input.read_u64::<BigEndian>().map(|v| v as usize).map_err(From::from),
        PAYLOAD_LEN_U16 => input.read_u16::<BigEndian>().map(|v| v as usize).map_err(From::from),
        _ => Ok(payload_len as usize) // payload_len < 127
    }
}
The code is highly condensed, so let’s take it piece-by-piece. First, look at the function signature:
fn read_length<R: Read>(payload_len: u8, input: &mut R) -> io::Result<usize> {
It takes two arguments: payload_len (the value from the header), and an input that uses the type argument R. The <R: Read> part defines that parameter.
Type arguments (or generics) allow functions to take and return values of arbitrary types — it’s a kind of a “type placeholder”. In our case we constrain the set of allowed types with types that implement the Read trait. Thus we say that we expect the input to be able to read bytes from some kind of a data source (that could be a string, a network socket, or just a vector of u8s — all of these implement the Read trait).
And, finally, we return the result typed as io::Result<usize>. io::Result is a type alias for Result we’ve used before — it’s defined in the std::io crate as follows:
type Result<T> = std::result::Result<T, io::Error>
What you need to understand is that it’s a shorthand for the basic Result. It specifies the error type while leaving the result type itself as a type argument, essentially in the same way as in case of functions.
Next, we match on the payload_len:
return match payload_len {
    PAYLOAD_LEN_U64 => input.read_u64::<BigEndian>().map(|v| v as usize).map_err(From::from),
    …
}
Here we use the byteorder crate we’ve described earlier. At the top of the module we import it like this:
use byteorder::{ReadBytesExt, BigEndian};
The ReadBytesExt module provides a trait that contains methods to read u16s, u32s, and u64s with a certain byte order. And here’s a bit of magic: ReadBytesExt extends another trait, Read, effectively adding its methods to all structs that implement it. In fact, this way you can extend any trait (or structure) in Rust, adding new methods to all already existing and future structures[2].
And it’s simple to use. Look how it’s implemented in the byteorder source code:
/// Extends `Read` with methods for reading numbers. (For `std::io`.)
pub trait ReadBytesExt: io::Read {
    fn read_u16<T: ByteOrder>(&mut self) -> Result<u16> {
        // … omitted code …
    }

    // … omitted read_u32, read_u64, etc. …
}

/// All types that implement `Read` get methods defined in `ReadBytesExt`
/// for free.
impl<R: io::Read + ?Sized> ReadBytesExt for R {}
The key here is the last line: it declares a type argument R that includes a set of all structures which has the io::Read trait, and implements the ReadBytesExt for them. Notice that the impl body is empty, as ReadBytesExt already implements all methods.
The byte order is specified as a type argument as well: it’s determined by a type that has ByteOrder trait. There are two of these already defined in the library: BigEndian and LittleEndian.
So that’s how we use it in our code, reading 8 bytes in the network order:
input.read_u64::<BigEndian>()
    .map(|v| v as usize)
    .map_err(From::from),
With map and map_err we transform the result of a type Result<u64, byteorder::Error> to Result<usize, io::Error>. map changes the result’s type and map_err the error’s type, respectively.
Masking
The protocol instructs us to read the masking key after the payload length, but only if mask bit is set to 1.
The Option type will fit nicely here:
let mask_key = if header.masked {
    let mask = try!(Self::read_mask(input));
    Some(mask)
} else {
    None
}
One interesting thing here: the try! macro. It’s just a shorthand for a boilerplate match expression to handle errors. In this case it expands to the following code:
match Self::read_mask(input) {
    Ok(val) => val,
    Err(err) => {
        return Err(From::from(err))
    }
}
First it checks if the returned value is not an error, and then unpacks and returns it:
Ok(val) => val,
If there is an error, it converts the error type to the type returned by the function (io::Error in this case):
Err(err) => {
    return Err(From::from(err))
}
The try! macro is a simple and clean way to handle errors, because writing these match expressions by hand can be pretty tedious.
Now let’s look at the read_mask implementation (nothing special here — we’re just reading 4 sequential bytes to an array):
fn read_mask<R: Read>(input: &mut R) -> io::Result<[u8; 4]> {
    let mut buf = [0; 4];
    try!(input.read(&mut buf));
    Ok(buf)
}
And, after we’ve read the mask, let’s read the frame payload:
fn read_payload<R: Read>(payload_len: usize, input: &mut R) -> io::Result<Vec<u8>> {
    let mut payload: Vec<u8> = Vec::with_capacity(payload_len);
    payload.extend(iter::repeat(0).take(payload_len));
    try!(input.read(&mut payload));
    Ok(payload)
}
It needs some clarifications. First, we define a buffer that will hold the payload data:
let mut payload: Vec<u8> = Vec::with_capacity(payload_len);
Vec::with_capacity constructs a vector with some preallocated capacity. We use a vector, a dynamic array structure, because the standard way of declaring byte arrays, [0; <len>], can’t take a variable <len> and can’t be expanded — these are the static buffers.
Vectors allow us to define arrays of arbitrary length. But we need to know about a slightly vague difference between a vector’s capacity and length.

Length is a number of elements within the vector, while capacity defines how many elements can the vector hold without a reallocation. When a vector is reallocated, all its elements are moved to an entirely new memory region. That’s by definition is not a quick process, so the better you estimate the vector’s length the faster it will work.
But here’s a caveat — we read data from the Read source as follows:
try!(input.read(&mut payload));
The read method doesn’t know how many bytes exactly it should read, so it depends on a length of the provided buffer. And since the vector that we provide as a buffer initially contains no elements, the length will be equal to zero and the read call won’t return anything.
That’s why we need a trick to fill the buffer beforehand:
payload.extend(iter::repeat(0).take(payload_len));
We just create an iterator that repeats a zero payload_len times, effectively creating a sequence [0, 0, 0, ...payload_len].
And that’s it — now we have a vector with the frame’s payload. Now we only need to unmask it, as defined in the RFC:
5.3 Client-to-Server Masking
To convert masked data into unmasked data, or vice versa, the following algorithm is applied. The same algorithm applies regardless of the direction of the translation, e.g., the same steps are applied to mask the data as to unmask the data.
Octet i of the transformed data ("transformed-octet-i") is the XOR of octet i of the original data ("original-octet-i") with octet at index i modulo 4 of the masking key ("masking-key-octet-j"):
j                   = i MOD 4
transformed-octet-i = original-octet-i XOR masking-key-octet-j
That’s exactly what we’re doing next, iterating with iter_mut over every byte in the buffer, and XORing them with the mask key:
fn apply_mask(mask: [u8; 4], bytes: &mut Vec<u8>) {
    for (idx, c) in bytes.iter_mut().enumerate() {
        *c = *c ^ mask[idx % 4];
    }
}
iterate_mut() allows us to modify the vector data in-place, while iterating. And enumerate() transforms the iterator to return actual elements with their indexes (we need it to get the corresponding byte in the mask key).
Bitwise XOR operation, ^, is very similar to bitwise AND: it outputs 1 only if either A or B is true (i.e. equals to 1), but not both of them. And while we use AND masks to get a subset of a bit string, XOR masks are used to toggle bits in a certain order. The order of the mask bits can be randomized, and this way it can be used as a rudimentary security measure in some cases (but you should bear in mind that it’s by no means secure, because it’s not encryption). That’s the reason it’s required by the protocol — the random XOR masks are used to prevent the cache poisoning attack[3].
Wrapping Up
Now that we’ve got every bit in place, we can add the final frames handling code to the WebSocketClient struct:
impl WebSocketClient {
    // … omitted code …
    fn read(&mut self) {
        match self.state {
            ClientState::AwaitingHandshake(_) => { … },

            // Add a new state handler:
            ClientState::Connected => {
                let frame = WebSocketFrame::read(&mut self.socket);
                match frame {
                    Ok(frame) => println!("{:?}", frame),
                    Err(e) => println!("error while reading frame: {}", e)
                }
            }
        }
    }
}
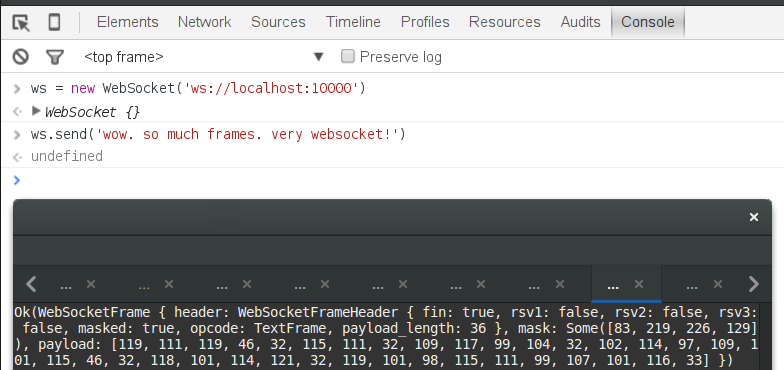
That’s all. You can run the server with cargo run and try to connect to it from a browser. The incoming frames will show up in the terminal:
19 Sending Frames
It’s more simple and straightforward to send frames than to read them, because it doesn’t involves masking. All that we have to do is to construct a frame from some source (a string, a byte array, etc.) and send it over a socket.
We start with an associcated function to construct an outgoing frame header from provided arguments:
impl WebSocketFrameHeader {
    fn new_header(len: usize, opcode: OpCode) -> WebSocketFrameHeader {
        WebSocketFrameHeader {
            fin: true,
            rsv1: false, rsv2: false, rsv3: false,
            masked: false,
            payload_length: Self::determine_len(len),
            opcode: opcode
        }
    }

    fn determine_len(len: usize) -> u8 {
        if len < (PAYLOAD_LEN_U16 as usize) {
            len as u8
        } else if len < (u16::MAX as usize) {
            PAYLOAD_LEN_U16
        } else {
            PAYLOAD_LEN_U64
        }
    }
}
The 2 arguments are a length of the payload, and an opcode marking the type of the frame. determine_len is used to calculate the “special” length value from the RFC (126 and 127 constants we’ve seen earlier).
As you remember, there are several types of frames, for text and binary messages. For now our application uses only text, so let’s add a string-to-frame converter first:
impl<'a> From<&'a str> for WebSocketFrame {
    fn from(payload: &str) -> WebSocketFrame {
        WebSocketFrame {
            header: WebSocketFrameHeader::new_header(payload.len(), OpCode::TextFrame),
            payload: Vec::from(payload),
            mask: None
        }
    }
}
It uses a special trait, From, that simplifies conversions between types. In this case the frames are converted from &str, to the complete trait signature is From<&'a str>.
But why &'a str and not just &str, and what’s that impl<'a>? That’s another big concept in the Rust language: lifetimes. We haven’t encountered it in full yet because usually lifetimes are implicit, but actually they’re an essential part of the borrow checker. They determine how long a memory region associated with a variable remains allocated and safe to use.
By default, each borrowed value’s lifetime is confined by its scope, but in several cases (such as when you return a borrowed value as a function result) it’s required to put the lifetime on a variable explicitly, by using lifetime parameters (akin to the type arguments we’ve already used). That’s the weird-looking 'a’s you see in the code sample above. Usually lifetime parameters can be infered by the compiler, though (in the similar way as it infers variable types). That’s why in the code above we don’t need to set the lifetime explicitly anywhere besides the type argument for the Form trait. And that’s all we need to know about it for now, but if you’re eager to learn more about this topic, read a chapter on it in the Rust book.
Let’s get back to our frame construction code. We got all data that we need in the structs, and now we need to put it to use by converting it into the frame bits. We add a converse operation to parse_header first, adding a serialize_header function to the WebSocketFrame:
impl WebSocketFrame {
    // … omitted code …
    fn serialize_header(hdr: &WebSocketFrameHeader) -> u16 {
        let b1 = ((hdr.fin as u8) << 7)
                  | ((hdr.rsv1 as u8) << 6)
                  | ((hdr.rsv2 as u8) << 5)
                  | ((hdr.rsv3 as u8) << 4)
                  | ((hdr.opcode as u8) & 0x0F);

        let b2 = ((hdr.masked as u8) << 7)
            | ((hdr.payload_length as u8) & 0x7F);

        ((b1 as u16) << 8) | (b2 as u16)
    }
}
As you might have guessed, << is the bit shift operation. It works exactly the same way as the right shift, >>, only moving bits to the left:
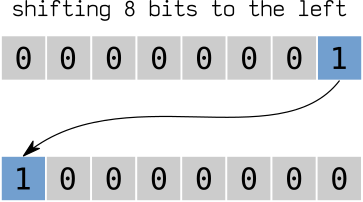
| (as in A | B) is the bitwise OR, another useful operation that can be used to add bits together. That is, if one bit string has 1 where another has 0, the resulting output will always have a 1 in that place:
This way we assemble the frame header into a word (u16), shifting the first byte by 8 bits and adding the second byte by using the OR operation:
((b1 as u16) << 8) | (b2 as u16)
Our next stop is write, a function that writes a frame to a certain output stream (a socket or a file):
pub fn write<W: Write>(&self, output: &mut W) -> io::Result<()> {
    let hdr = Self::serialize_header(&self.header);
    try!(output.write_u16::<BigEndian>(hdr));

    match self.header.payload_length {
        PAYLOAD_LEN_U16 => try!(output.write_u16::<BigEndian>(self.payload.len() as u16)),
        PAYLOAD_LEN_U64 => try!(output.write_u64::<BigEndian>(self.payload.len() as u64)),
        _ => {}
    }

    try!(output.write(&self.payload));
    Ok(())
}
We write the 2 bytes of the header, the payload length (if it’s bigger than 125), and the payload itself.
And that’s it! We don’t need to apply any masking here, because RFC specifically points that a server must not mask the data it sends.
The only thing that remains is changes in WebSocketClient.write — let’s add a match on a current state and move the exisiting code to another function, write_handshake:
impl WebSocketClient {
    fn write(&mut self) {
        match self.state {
            ClientState::AwaitingHandshake(_) => {
                self.write_handshake();
            },
            _ => {}
        }
    }

    fn write_handshake(&mut self) {
        let headers = self.headers.borrow();
        let response_key = gen_key(&headers.get("Sec-WebSocket-Key").unwrap());
        …
    }
}
Then we can add a case to handle ClientState::Connected state. It will take frames queued for sending and send them over the network. The queue itself is not required, but it’s convenient, as we don’t want to switch the context of the event loop from reading to writing for every single frame that we send. Let’s add it to the WebSocketClient struct:
struct WebSocketClient {
    socket: TcpStream,
    …
    // Add outgoing frames queue:
    outgoing: Vec<WebSocketFrame>
}
And add it to the WebSocketClient constructor:
impl WebSocketClient {
    // … omitted code …
    fn new(socket: TcpStream) -> WebSocketClient {
        let headers = Rc::new(RefCell::new(HashMap::new()));

        WebSocketClient {
            …
            outgoing: Vec::new()
        }
    }
}
And, finally, write the frames to the socket in the write function:
match self.state {
    ClientState::HandshakeResponse => …,
    ClientState::Connected => {
        println!("sending {} frames", self.outgoing.len());

        for frame in self.outgoing.iter() {
            if let Err(e) = frame.write(&mut self.socket) {
                println!("error on write: {}", e);
            }
        }

        self.outgoing.clear();

        self.interest.remove(EventSet::writable());
        self.interest.insert(EventSet::readable());
    },
    _ => {}
}
Here we iterate over the frames in the outgoing queue, send them, clear the queue, and switch the event subscription to read. To check if it’s actually working, let’s send an echo reply for every text frame that we receive. Let’s modify the read function:
fn read(&mut self) {
    match self.state {
        ClientState::AwaitingHandshake(_) => { … },
        ClientState::Connected => {
            let frame = WebSocketFrame::read(&mut self.socket);
            match frame {
                Ok(frame) => {
                    println!("{:?}", frame),

                    // Add a reply frame to the queue:
                    let reply_frame = WebSocketFrame::from("Hi there!");
                    self.outgoing.push(reply_frame);

                    // Switch the event subscription to the write mode if the queue is not empty:
                    if (self.outgoing.len() > 0) {
                        self.interest.remove(EventSet::readable());
                        self.interest.insert(EventSet::writable());
                    }
                },
                Err(e) => println!("error while reading frame: {}", e)
            }
        }
    }
}
Let’s run cargo run and test it in the browser again. Run this code in the browser’s console:
ws = new WebSocket('ws://127.0.0.1:10000');

ws.onmessage = function (event) {
    console.log('Received response: ', event.data);
};
And, finally, say “hi” to our server:
ws.send('Hi');
That’s what we’ll get back:

20 Control Frames
But we have some more tedious work to do before we get to more interesting parts. We need to handle disconnected clients gracefully, and as now we don’t support the sequence required by the protocol, which basically means we don’t handle several control frames properly. There’s not much to cover in depth, so let’s do a quick run over.
Before we get to that, let’s proceed with further refactoring and move the frame receiving logic in WebSocketClient.read to a separate function:
pub fn read(&mut self) {
    match self.state {
        ClientState::AwaitingHandshake(_) => self.read_handshake();
        ClientState::Connected => self.read_frame(),
        _ => {}
    }
}

fn read_frame(&mut self) {
    let frame = WebSocketFrame::read(&mut self.socket);
    …
}
For starters, let’s add support for more simple control frames, ping & pong, that are used to check if a WebSocket connection is alive. We change read_frame to match on a frame type:
fn read_frame(&mut self) {
    let frame = WebSocketFrame::read(&mut self.socket);

    match frame {
        Ok(frame) => {
            match frame.get_opcode() {
                OpCode::TextFrame => {
                    println!("{:?}", frame),
                    let reply_frame = WebSocketFrame::from("Hi there!");
                    self.outgoing.push(reply_frame);
                },
                _ => {}
            }
            self.interest.remove(EventSet::readable());
            self.interest.insert(EventSet::writable());
        }
        Err(e) => println!("error while reading frame: {}", e)
    }
}
We use a function we’ve introduced earlier, get_opcode, to match on a frame type.
Now let’s add a case to handle Ping frames:
match frame.get_opcode() {
    OpCode::TextFrame => …,
    OpCode::Ping => {
        println!("ping/pong");
        self.outgoing.push(WebSocketFrame::pong(&frame));
    }
    _ => {}
}
And code to construct a Pong frame from an incoming ping (as required by the protocol):
impl WebSocketFrame {
    // … code omitted …
    pub fn pong(ping_frame: &WebSocketFrame) -> WebSocketFrame {
        let payload = ping_frame.payload.clone();
        WebSocketFrame {
            header: WebSocketFrameHeader::new_header(payload.len(), OpCode::Pong),
            payload: payload,
            mask: None
        }
    }
}
Now we can proceed to Close frames:
match frame.get_opcode() {
    OpCode::TextFrame => …,
    OpCode::Ping => …,

    // Add a case for ConnectionClose frames:
    OpCode::ConnectionClose => {
        self.outgoing.push(WebSocketFrame::close_from(&frame));
    },
    _ => {}
}
The protocol requires us to reply with a corresponding close frame to each ConnectionClose request that we receive, and the reply is actually must be based on the incoming data. The protocol also specifies that a close frame can contain a body, and if there is a body, it must start with a 2-byte status code:
The first two bytes of the body MUST be a 2-byte unsigned integer (in network byte order) representing a status code with value /code/ defined in Section 7.4.
The Section 7.4 defines a bunch of status codes, but we won’t need them for now. Let’s just add a new frame constructor, close_from, that takes a request and makes a response out of it:
impl WebSocketFrame {
    …
    pub fn close_from(recv_frame: &WebSocketFrame) -> WebSocketFrame {
        let body = if recv_frame.payload.len() > 0 {
            let status_code = &recv_frame.payload[0..2];
            let mut body = Vec::with_capacity(2);
            body.write(status_code);
            body
        } else {
            Vec::new()
        };
        WebSocketFrame {
            header: WebSocketFrameHeader::new_header(body.len(), OpCode::ConnectionClose),
            payload: body,
            mask: None
        }
    }
}
There’s a last bit. When we receive a close request, we ought to close the underlying TCP connection as well. We can do it when we write the queued frames in WebSocketClient by changing the event subscription to hup as follows:
impl WebSocketClient {
    fn write(&mut self) {
        match self.state {
            ClientState::HandshakeResponse => …,
            ClientState::Connected => {
                // Add a boolean flag:
                let mut close_connection = false;

                for frame in self.outgoing.iter() {
                    if let Err(e) = frame.write(&mut self.socket) {
                        println!("error on write: {}", e);
                    }

                    // Check if there's a frame that wants to close the connection:
                    if (frame.is_close()) {
                        close_connection = true;
                    }
                }

                self.outgoing.clear();

                self.interest.remove(EventSet::writable());
                // Add a `hup` event if we want to close the connection:
                if (close_connection) {
                    self.interest.insert(EventSet::hup());
                } else {
                    self.interest.insert(EventSet::readable());
                }
            },
            _ => {}
        }
    }
}
And we should add a method to check if the frame opcode is close:
impl WebSocketFrame {
    // … omitted code …
    pub fn is_close(&self) -> bool {
        self.header.opcode == OpCode::ConnectionClose
    }
}
And the last bit is the WebSocketServer, where we need to remove disconnected clients from the store:
impl Handler for WebSocketServer {
    // … omitted code …
    fn ready(&mut self, event_loop: &mut EventLoop<WebSocketServer>, token: Token, events: EventSet) {
        if events.is_readable() {
            …
        }

        if events.is_writable() {
            …
        }

        // Handle connection hangup:
        if events.is_hup() {
            let client = self.clients.remove(&token).unwrap();

            client.socket.shutdown(Shutdown::Both);
            event_loop.deregister(&client.socket);
        }
    }
}
And for now we’re done.
21 Conclusion
That was a big step forward for us. We’ve reviewed several important concepts in network programming and protocol parsing, continued to implement the WebSocket protocol, and laid the foundation for a high-level WebSocket library.
In the third part we’ll further simplify the usage of the library, discuss multithreaded event loops, and cover the basics of benchmarking and optimization. If you want to stay updated, subscribe to the blog’s RSS or follow me on Twitter.
As always, the current code is available on GitHub. I’d be happy to accept any pull request if you have something to add or improve.
Have fun & thanks for reading!
Comments
References
[1] You might be wondering, why x86 uses the “unnatural” order? The answer is simple: remember how you carry numbers when you’re adding them, starting from a least significant digit. CPUs that use the little-endian order add and multiply numbers exactly the same way, starting with the least significant byte. ↑
[2] If you program in C#, you might have already used this feature — it’s known as extension methods there. Haskell & Scala fans: you guessed right, that’s the same thing as type classes. ↑
[3] Described in a paper “Talking to Yourself for Fun and Profit”. Also, check StackOverflow: “What is the mask in a WebSocket frame?”. ↑