Rust in Detail: Writing Scalable Chat Service from Scratch
Part 1: Implementing WebSocket. Introduction.
In this series of articles we’ll follow the process of creating a scalable, real-time chat service.
The objective is to learn more about practical usage of the emerging language Rust and to cover the basic problems of using system programming interfaces, going step by step.
Part 1 covers the project setup and the implementation of a bare bones WebSocket server. You don’t need to know Rust to follow, but some prior knowledge of POSIX API or C/C++ would certainly help. And what would help you even more is a good cup of coffee — beware that this article is fairly long and very low-level.
Let’s begin the journey!
Table of Contents
- Why Rust?
- Goals
- Approaches to I/O
- Event Loop
- Starting Project
- Event Loop in Rust
- TCP Server
- Accepting Connections
- Parsing HTTP
- Handshake
- Conclusion
- Resources
- References
1 Why Rust?
I became interested in Rust because I’ve always liked systems programming. But while the area of low-level development is joyfully challenging and fulfilling, there’s a common belief that it’s very hard to do it correctly — and it’s not surprising at all, considering how many non-obvious pitfalls awaiting neophytes and seasoned developers alike.
![]()
But arguably the most common pitfall is the memory safety. It is the root cause for a class of bugs such as buffer overflows, memory leaks, double deallocations, and dangling pointers. And these bugs can be really nasty: well known issues like the infamous OpenSSL Heartbleed bug is caused by nothing more than the incorrect management of memory — and nobody knows how much more of these severe bugs are lurking around.
However, there are several good practice approaches in C++ such as smart pointers[1] and on-stack allocation[2] to mitigate these common issues. But, unfortunately, it’s still too easy to “shoot yourself in the foot” by overflowing a buffer or by incorrectly using one of the low-level memory management functions because these practices and constraints aren’t enforced on the language level.
Instead, it’s believed that all well-grounded developers would do good and make no mistakes whatsoever. Conversely, I do believe that these critical issues have nothing to do with the level of skill of a developer because it’s a machine’s task to check for errors — human beings just don’t have that much attention to find all weaknesses in large codebases.
That’s the major reason of existence for a common way to automatically handle the memory management: the garbage collection. It’s a complex topic and a vast field of knowledge in itself. Almost all modern languages and VMs use some form of GC, and while it’s suitable in most cases, it has its own shortcomings — it’s complex[3], it introduces an overhead of a pause to reclaim unused memory[4], and generally requires intricate tuning tricks for high-performance applications to reduce the pause time.
Rust takes a slightly different approach — basically, a middle ground: automatic memory and resources reclamation without a significant overhead and without the requirement of a tiresome and error-prone manual memory management. It’s achieved by employing ownership and borrowing concepts.
The language itself is built upon the assumption that every value has exactly one owner. It means that there could be only one mutable variable pointing to the same memory region:
let foo = vec![1, 2, 3];
// We've created a new vector containing elements 1, 2, 3 and
// bound it to the local variable `foo`.

let bar = foo;
// Now we've handed ownership of the object to the variable `bar`.
// `foo` can't be accessed further, because it has no binding now.
And, because values bind to exactly one place, resources that they hold (memory, file handles, sockets, etc.) can be automatically freed when the variable goes out of a scope (defined by code blocks within curly braces, { and }).
This may sound unnecessarily complicated, but, if you think about it, this concept is very pragmatic. Essentially, it’s Rust’s killer feature — these restrictions provide the memory safety that makes Rust feel like a convenient high-level language, while at the same time it retains the efficiency of pure C/C++ code.
Despite all these interesting features, until recently Rust has had some significant disadvantages such as an unstable API, but after almost 10 years[5] the stable version 1.0 has finally landed, and the language has matured to the point when we’re finally ready to put it into a practical usage.
2 Goals
I prefer to learn new languages and concepts by doing relatively simple projects with a real-world application — this way language features can be learned along the way when they’re needed in practice at hand.
As a project to learn Rust I’ve chosen an anonymous text chat service similar to Chat Roulette. In my opinion chat is a good choice because chat services require fast responses from a server and an ability to handle many connections at once (we’ll strive for many thousands — that will be a good test for the Rust’s raw performance and memory footprint).
Ultimately, the practical end result should be a binary executable and a bunch of deployment scripts to run the service in various cloud environments.
But before we’ll start writing the actual code, we need to take a detour to understand the input & output operations, which are essential and crucial for such network services.
3 Approaches to I/O
To function properly, our service needs to send and receive data through the network sockets.
It may sound like a simple task, but there are several ways of varying complexity to handle the input and output operations efficiently. The major difference between the approaches lies in the treatment of blocking: the default is to prevent all CPU operations while we’re waiting for data to arrive to a network socket.
Since we can’t allow one user of our chat service to block others, we need to isolate them somehow.
A common way is to create a separate thread for an each user so that blocking would take effect only in the context of a single thread. But while the concept is simple and such code is easy to write, each thread requires memory for its stack[6] and has an overhead of context switches — modern server CPUs usually have about 8 or 16 cores, and spawning many more threads requires an OS kernel scheduler to work hard to switch execution between them with an adequate speed. For this reason it’s hard to scale multithreading to many connections — in our case it’s barely practical (though certainly possible) to spawn several thousands of system threads, because we want to handle that many users without significant costs — think about the front pages of TechCrunch, HN, and Reddit linking our cool app at once!
4 Event Loop

So, instead we’ll use efficient I/O multiplexing system APIs that employ an event loop — that’s epoll on Linux[7] and kqueue on FreeBSD and OS X[8].
These different APIs work similarly in a straightforward way: bytes are coming over the network, arriving at the sockets, and instead of waiting when the data becomes available for a read, we’re telling a socket to notify us when new data arrives.
Notifications come in a form of events that end up in the event loop. And that’s where the blocking happens in this case: instead of periodic checks for thousands of sockets, we’re just waiting for new events to arrive. That’s an important distinction because particularly in WebSocket applications it’s very common to have many idle clients just waiting for some activity. With asynchronous I/O we’ll have a very little overhead of a socket handle and hundreds of bytes at most for an each client.
Interestingly enough, it works great not only for network communications but for disk I/O as well, as the event loop accepts all kinds of file handles (and sockets in the *nix world are just file handles too).
5 Starting Project
Rust ships with a convenient tool called cargo that’s similar to Maven/Composer/npm/rake. It manages library dependencies, handles the build process, runs test suites, and simplifies the process of creating a new project.
That’s what we need to do now, so let’s open a terminal app, and execute the following command:
cargo new chat --bin
The --bin part tells Cargo to create a program instead of a library.
As a result, we get two files:
Cargo.toml
src/main.rs
Cargo.toml contains a description and dependencies of the project (similar to JavaScript’s package.json).
src/main.rs is the main source file of our project.
We need nothing more to start, and now we can compile and execute the program with a single command cargo run. Also, it will show us compilation errors if we’d have any.
6 Event Loop in Rust
Now we’re ready to put the theory into practice — let’s start with creating a simple event loop that will wait for new events. Fortunately, we don’t need to wire up all system calls to work with the according APIs ourselves — there’s a Rust library, Metal IO (or mio for short), that does it for us.
As you remember, library dependencies are managed by Cargo. It gets libraries from crates.io, the Rust packages repository, but allows to retrieve dependencies straight from Git repositories as well. This feature can be useful when we need to use the latest version of a library that hasn’t been packaged yet.
At the moment of this writing mio has a package only for the version 0.4, while v.0.5 has some new useful features and breaking API changes, so for now let’s use the bleeding edge version by adding the reference to the library to Cargo.toml:
[dependencies]
mio = { git = "https://github.com/carllerche/mio" }
After we’ve added the dependency we need to import it in our code, so let’s put it into main.rs as well:
extern crate mio;
use mio::*;
Usage of mio is pretty simple: first, we need to create the event loop by calling EventLoop::new() function, and, as the bare event loop isn’t useful, we need to make it aware of our chat service. To do that we should define a structure with functions that should conform to a Handler interface.
Though Rust doesn’t support object-oriented programming in a “traditional” way, structures (or structs) are analogous in many ways to classes from the classic OOP, and they can implement interfaces that are enforced by a special language construct called traits.
Here’s how we define the struct:
struct WebSocketServer;
Implement the Handler trait for it:
impl Handler for WebSocketServer {
    // Traits can have useful default implementations, so in fact the handler
    // interface requires us to provide only two things: concrete types for
    // timeouts and messages.
    // We're not ready to cover these fancy details, and we wouldn't get to them
    // anytime soon, so let's get along with the defaults from the mio examples:
    type Timeout = usize;
    type Message = ();
}
Start the event loop:
fn main() {
    let mut event_loop = EventLoop::new().unwrap();
    // Create a new instance of our handler struct:
    let mut handler = WebSocketServer;
    // ... and provide the event loop with a mutable reference to it:
    event_loop.run(&mut handler).unwrap();
}
That’s our first encounter with borrows: notice the usage of &mut on the last line.
It tells that we’re temporary moving the ownership of the value to another binding, with an option to mutate (change) the value.
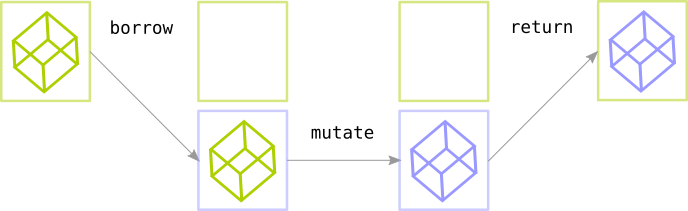
To simplify matters, you can imagine that the borrowing works like this (in pseudocode):
// Bind a value to an owner:
let owner = value;

// Create a new scope and borrow the value from the owner:
{
    let borrow = owner;

    // Owner has no access to the value now.
    // But the borrower can read and modify the value:
    borrow.mutate();

    // And then return the borrowed value to the owner:
    owner = borrow;
}
That code is roughly equal to this:
// Bind a value to an owner:
let owner = value;
{
    // Borrow the value from the owner:
    let mut borrow = &mut owner;

    // Owner has a read-only access to the value.
    // And the borrower can modify it:
    borrow.mutate();

    // Borrowed value is automatically returned to the owner
    // when it goes out of the scope.
}
There could be only one mutable borrow of a value per scope. In fact, even the owner from which the value has been borrowed can’t read or change it until the borrow will fall out of a scope.
However, there exists another, more simple way of borrowing that allows to read the value but doesn’t allow to modify it — the immutable borrowing. In contrast with &mut, there’s no limit on count of read-only borrows for a single variable, but as with &mut it imposes a limit on modifications: as long as there are immutable borrows of a variable in a scope, the value can’t be changed or borrowed mutably.
Hopefully, that was a clear enough description. If it’s not, bear with me — the borrows are everywhere in Rust, so soon we’ll get a chance to practice more. Now, let’s get back to the project.
Run “cargo run” and Cargo will download all prerequisite dependencies, compile the program (showing some warnings that we can ignore at the moment), and run it.
As a result, we’ll get the terminal with just a blinking cursor. Not too encouraging, but actually that’s a sign of correct execution — we’ve started the event loop successfully, although at the moment it does nothing useful for us. Let’s fix that.
7 TCP Server
To start a TCP server that will be accepting WebSocket connections we’ll use a special struct from the mio::tcp namespace, TcpListener, and follow the standard workflow of establishing a server-side TCP socket: binding to an address, listening, and accepting connections.
Look at the code:
use std::net::SocketAddr;
use mio::tcp::*;
...
let address = "0.0.0.0:10000".parse::<SocketAddr>().unwrap();
let server_socket = TcpListener::bind(&address).unwrap();

event_loop.register(&server_socket,
                    Token(0),
                    EventSet::readable(),
                    PollOpt::edge()).unwrap();
And let’s go over it, line by line.
First we need to add TCP namespace and socket address structure imports to the top of the main.rs file:
use mio::tcp::*;
use std::net::SocketAddr;
Parse the string "0.0.0.0:10000" to an address structure and bind the socket to it:
let address = "0.0.0.0:10000".parse::<SocketAddr>().unwrap();
Notice how the compiler infers types for us: because TcpListener::bind expects an argument of the type SockAddr, the Rust compiler can figure out the appropriate type of the address for itself, so we don’t need to clutter the code with explicit types information.
Bind the address and start listening:
let server_socket = TcpListener::bind(&address).unwrap();
Also, you might be wondering why we call unwrap almost on every line — we’ll get to that soon.
For now we need to register the socket within the event loop:
event_loop.register(&server_socket,
                        Token(0),
                        EventSet::readable(),
                        PollOpt::edge()).unwrap();
Arguments for register are slightly more complicated:
- Token is a unique identifier for a socket. Somehow we need to distinguish sockets among themselves when an event arrives in the loop, and the token serves as a link between a socket and its generated events. Here we link
Token(0)with the listening socket. - EventSet describes our intent for the events subscription: are we waiting for new data to arrive at the socket, for a socket to become available for a write, or for both?
- PollOpt are options for the subscription.
PollOpt::edge()means that we prefer edge-triggered events to level-triggered.
The difference between two can be put this way: the level-triggered subscription notifies when a socket buffer has some data available to read, while the edge-triggered notifies only when new data has arrived to a socket. I.e., in case of edge-triggered notifications, if we haven’t read all data available in the socket, we won’t get new notifications until some new data will arrive. With level-triggered events we’ll be getting new notifications as long as there’s some data to read in the socket’s buffer. You can refer to StackOverflow answers to get more details.
Now, if we’ll run the resulting program with cargo run and check the lsof output, we will see that it’s indeed listening on the port number 10000:
$ lsof -i :10000
COMMAND   PID        USER   FD   TYPE             DEVICE SIZE/OFF NODE NAME
chat    58490 <your user>   6u   IPv4 0x333c1924c045ccc7      0t0  TCP *:ndmp (LISTEN)
8 Accepting Connections
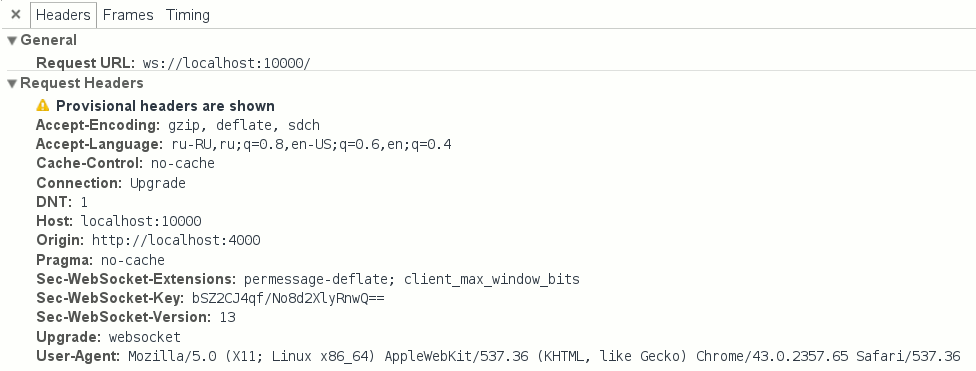
All WebSocket connections start with a handshake — a special sequence of HTTP requests and responses to negotiate the protocol. Hence, we need to teach the server to talk HTTP/1.1 to successfully implement WebSocket.
We’ll need only a subset of HTTP, though: a client wanting to negotiate a WebSocket connection just sends a request with Connection: Upgrade and Upgrade: websocket headers, and we need to reply in a predefined manner. And that’s all: we won’t need a full-blown web server to serve static content, etc. — there are plenty of other tools that will do this for us.
But before we start to implement HTTP, we need to properly handle client connections, accepting them and subscribing to the socket events.
Here’s the basic implementation:
use std::collections::HashMap;

struct WebSocketServer {
    socket: TcpListener,
    clients: HashMap<Token, TcpStream>,
    token_counter: usize
}

const SERVER_TOKEN: Token = Token(0);

impl Handler for WebSocketServer {
    type Timeout = usize;
    type Message = ();

    fn ready(&mut self, event_loop: &mut EventLoop<WebSocketServer>,
             token: Token, events: EventSet)
    {
        match token {
            SERVER_TOKEN => {
                let client_socket = match self.socket.accept() {
                    Err(e) => {
                        println!("Accept error: {}", e);
                        return;
                    },
                    Ok(None) => unreachable!("Accept has returned 'None'"),
                    Ok(Some((sock, addr))) => sock
                };

                self.token_counter += 1;
                let new_token = Token(self.token_counter);

                self.clients.insert(new_token, client_socket);
                event_loop.register(&self.clients[&new_token],
                                    new_token, EventSet::readable(),
                                    PollOpt::edge() | PollOpt::oneshot()).unwrap();
            }
        }
    }
}
There is a lot more code now, so let’s look at it in more detail.
First thing we need to do is to make the server struct WebSocketServer stateful: it needs to contain the listening socket and store connected clients.
use std::collections::HashMap;

struct WebSocketServer {
    socket: TcpListener,
    clients: HashMap<Token, TcpStream>,
    token_counter: usize
}
We’re using HashMap from the standard collections library, std::collections, to store client connections. As a key for the hash map we’re using a unique, non-overlapping token that we should generate for an each connection to identify it.
To provide reasonable uniqueness, we’ll just use a simple counter to generate new tokens sequentially. That’s why token_counter variable is there.
Next, the Handler trait from mio becomes useful again:
impl Handler for WebSocketServer
Here we need to override a callback function ready within the trait implementation. Overriding means that the Handler trait already contains a dummy ready implementation (besides other default stubs for several callback functions as well). It does nothing useful, so we need to write our own version to handle events:
fn ready(&mut self, event_loop: &mut EventLoop<WebSocketServer>,
         token: Token, events: EventSet)
This function gets called each time a socket becomes available for a read or write (depending on our subscription), and we’re provided with some useful info about the event through the call arguments: the event loop instance, the token linked to the event source (socket), and events, a set of flags that provide details about the occurred event that could be either readable or writable.
The listening socket generate readable events when a new client arrives into the acception queue and when we’re ready to connect with it. And that’s what we do next, but first we need to make sure that the event has sourced from the listening socket by doing pattern matching on a token:
match token {
    SERVER_TOKEN => {
        ...
    }
}
What does it mean? Well, the match syntax resembles the standard switch construct you can find in “traditional” imperative languages, but it has a lot more power to it. While in e.g. Java switch can match only on numbers, strings, and enums, Rust’s match works on ranges, multiple values, and structures as well, and more than that — it can capture values from patterns, similar to capturing groups from the regular expressions.
In this case we’re matching on a token to determine what socket has generated the event — and, as you remember, Token(0) corresponds to the listening socket on our server. In fact, we’ve made it a constant to be more descriptive:
const SERVER_TOKEN: Token = Token(0);
So the above match expression is equivalent to match { Token(0) => ... }.
Now that we know that we’re dealing with the server socket, we can proceed to accepting a client’s connection:
let client_socket = match self.socket.accept() {
    Err(e) => {
        println!("Accept error: {}", e);
        return;
    },
    Ok(None) => unreachable!(),
    Ok(Some((sock, addr))) => sock
};
Here we’re doing the matching again, now over an outcome of the accept() function call that returns the result typed as Result<Option<TcpStream>>. Result is a special type fundamental to errors handling in Rust. It wraps around uncertain results such as errors, timeouts, etc., and we might decide what to do with them in each individual case.
But we don’t have to — remember that strange unwrap() function that we were calling all the time? It has a standard implementation that terminates the program execution in case if the result is an error and returns it unwrapped if it’s normal. So basically by using unwrap we’re telling that we’re interested in the immediate result only, and it’s OK to shut down the program if an error has happened.
That’s an acceptable behavior in some places. However, in case of accept() it’s not wise to use unwrap() because it may accidentally shut down our entire service, effectively disconnecting all users, and we don’t want that. Instead, we’re just logging the fact of an error and continuing the execution:
Err(e) => {
    println!("Accept error: {}", e);
    return;
},
Option is another similar wrapper type that simply denotes that we either have some result or we don’t. If we have no result, the type has a value of None, and the actual result is wrapped by Some(value). As you might suggest, the type itself can be compared to null or None values that can be found in many programming languages, but actually Option is much safer — you’ll never get the very common NullReferenceException error unless you want to, as it works the same way as the Result type: when you unwrap() the Option it shuts down the process if the result is None.
So, let’s unwrap the accept() return value:
Ok(None) => unreachable!(),
In this case, there’s simply no way for the result to be None — accept() would return such value only if we’ll try to accept a connection on a non-listening socket. But as we’re pretty sure that we’re dealing with the server socket, it’s safe to crash the program using unreachable!() if accept() has returned an unexpected value.
So we’re just continuing to do the matching:
let client_socket = match self.socket.accept() {
    ...
    Ok(Some(sock)) => sock
}
That’s the most interesting part. Besides matching the pattern, this line captures the value that’s wrapped inside the Result<Option<TcpStream>> type. This way we can effectively unwrap the value and return it as a result of an expression. That means that match operation acts as a kind of “function” — we can return a matching result to a variable.
That’s what we do here, binding the unwrapped value to the client_socket variable. Next we’re going to store it in the clients hash table, while increasing the token counter:
let new_token = Token(self.token_counter);
self.clients.insert(new_token, client_socket);
self.token_counter += 1;
And finally we should subscribe to events from the newly accepted client’s socket by registering it within the event loop, in the very same fashion as with registration of the listening server socket, but providing another token & socket this time:
event_loop.register(&self.clients[&new_token],
                    new_token, EventSet::readable(),
                    PollOpt::edge() | PollOpt::oneshot()).unwrap();
You might have noticed another difference in the provided arguments: there is a PollOpt::oneshot() option along with the familiar PollOpt::edge(). It tells that we want the triggered event to temporarily unregister from the event loop. It helps us make the code more simple and straightforward because in the other case we would have needed to track the current state of a particular socket — i.e., maintain flags that we can write or read now, etc. Instead, we just simply reregister the event with a desired event set whenever it has been triggered.
Oh, and besides that, now that we’ve got more detailed WebSocketServer struct we must modify the event loop registration code in the main function a bit. Modifications mostly concern the struct initialization and are pretty simple:
let mut server = WebSocketServer {
    token_counter: 1,        // Starting the token counter from 1
    clients: HashMap::new(), // Creating an empty HashMap
    socket: server_socket    // Handling the ownership of the socket to the struct
};

event_loop.register(&server.socket,
                    SERVER_TOKEN,
                    EventSet::readable(),
                    PollOpt::edge()).unwrap();

event_loop.run(&mut server).unwrap();
9 Parsing HTTP
Afterwards, when we’ve accepted the client socket, by the protocol we should parse the incoming HTTP request to upgrade the connection to WebSocket protocol.
We won’t do it by hand, because it’s quite a boring task — instead, we’ll add another dependency to the project, the http-muncher crate that wraps the Node.js’s HTTP parser and adapts it for Rust. It allows to parse HTTP requests in a streaming mode that is very useful with TCP connections.
Let’s add it to the Cargo.toml file:
[dependencies]
http-muncher = "0.2.0"
We won’t review the API and just proceed to parsing HTTP:
extern crate http_muncher;
use http_muncher::{Parser, ParserHandler};

struct HttpParser;
impl ParserHandler for HttpParser { }

struct WebSocketClient {
    socket: TcpStream,
    http_parser: Parser<HttpParser>
}

impl WebSocketClient {
    fn read(&mut self) {
        loop {
            let mut buf = [0; 2048];
            match self.socket.try_read(&mut buf) {
                Err(e) => {
                    println!("Error while reading socket: {:?}", e);
                    return
                },
                Ok(None) =>
                    // Socket buffer has got no more bytes.
                    break,
                Ok(Some(len)) => {
                    self.http_parser.parse(&buf[0..len]);
                    if self.http_parser.is_upgrade() {
                        // ...
                        break;
                    }
                }
            }
        }
    }

    fn new(socket: TcpStream) -> WebSocketClient {
        WebSocketClient {
            socket: socket,
            http_parser: Parser::request(HttpParser)
        }
    }
}
And we have some changes in the WebSocketServer’s ready function:
match token {
    SERVER_TOKEN => {
        ...
        self.clients.insert(new_token, WebSocketClient::new(client_socket));
        event_loop.register(&self.clients[&new_token].socket, new_token, EventSet::readable(),
                            PollOpt::edge() | PollOpt::oneshot()).unwrap();
        ...
    },
    token => {
        let mut client = self.clients.get_mut(&token).unwrap();
        client.read();
        event_loop.reregister(&client.socket, token, EventSet::readable(),
                              PollOpt::edge() | PollOpt::oneshot()).unwrap();
    }
}
Now let’s review the new code line-by-line again.
First, we import the HTTP parser library and define a handling struct for it:
extern crate http_muncher;
use http_muncher::{Parser, ParserHandler};

struct HttpParser;
impl ParserHandler for HttpParser { }
We need the ParserHandler trait because it contains callback functions, the same way as the mio’s Handler for the WebSocketServer. These callbacks get called whenever the parser has some new info — HTTP headers, the request body, etc. But as for now we need only to determine whether the request asks for a WebSocket protocol upgrade, and the parser struct itself has a handy function to check that, so we’ll stick to the stub callbacks implementation.
There’s a detail: the HTTP parser is stateful, which means that we should create a new instance of it for each new client. Considering each client will contain its own parser state, we need to create a new struct to hold it:
struct WebSocketClient {
    socket: TcpStream,
    http_parser: Parser<HttpParser>
}
This struct will effectively replace the HashMap<Token, TcpStream> declaration with HashMap<Token, WebSocketClient>, so we’ve added the client’s socket to the state as well.
Also, we can use the same WebSocketClient to hold code to manage data coming from a client. It’d be too inconvenient to put all the code in the ready function — it would quickly become messy and unreadable. So we’re just adding a separate handler that will manage each client:
impl WebSocketClient {
    fn read(&mut self) {
        ...
    }
}
It doesn’t need to take any arguments because we already have the required state in the containing struct itself.
Now we can read the incoming data:
loop {
    let mut buf = [0; 2048];
    match self.socket.try_read(&mut buf) {
        ...
    }
}
Here’s what’s going on: we’re starting an infinite loop, allocate some buffer space to hold the data, and trying to read it to the buffer.
As the try_read call may result in an error, we’re matching the Result type to check for errors:
match self.socket.try_read(&mut buf) {
    Err(e) => {
        println!("Error while reading socket: {:?}", e);
        return
    },
    ...
}
Then we check if the read call has resulted in actual bytes:
match self.socket.try_read(&mut buf) {
    ...
    Ok(None) =>
        // Socket buffer has got no more bytes.
        break,
    ...
}
It returns Ok(None) in case if we’ve read all the data that the client has sent us. When that happens we go to wait for new events.
And, finally, here’s the case when the try_read has written bytes to the buffer:
match self.socket.try_read(&mut buf) {
    ...
    Ok(Some(len)) => {
        self.http_parser.parse(&buf[0..len]);

        if self.http_parser.is_upgrade() {
            // ...
            break;
        }
    }
}
Here we’re providing a slice of the data to the parser, and then check if we have a request to “upgrade” the connection (which means that a user has provided the Connection: Upgrade header).
The final part is the new method to conveniently create new WebSocketClient instances:
fn new(socket: TcpStream) -> WebSocketClient {
    WebSocketClient {
        socket: socket,
        http_parser: Parser::request(HttpParser)
    }
}
This is an associated function which is analogous to static methods in the conventional OOP systems, and this particular function can be compared to a constructor. In this function we’re just creating a new instance of WebSocketClient struct, but in fact we can perfectly do the job without the “constructor” function — it’s just a shorthand, because without it the code would quickly become repetitive. After all, the DRY principle exists for a reason.
There are few more details. First, notice that we don’t use an explicit return statement to return the function result. Rust allows to return the result implicitly from a last expression of a function.
Second, this line deserves more elaboration:
http_parser: Parser::request(HttpParser)
Here we’re creating a new instance of the Parser by using an associated function Parser::request, and we’re creating and passing a new instance of the previously defined HttpParser struct as an argument.
Let’s get back to the server code.
To finish up, we’re making changes in the server socket handler:
match token {
    SERVER_TOKEN => { ... },
    token => {
        let mut client = self.clients.get_mut(&token).unwrap();
        client.read();
        event_loop.reregister(&client.socket, token, EventSet::readable(),
                              PollOpt::edge() | PollOpt::oneshot()).unwrap();
    }
}
We’ve added a new match expression that captures all tokens besides SERVER_TOKEN, that is the client socket events.
After we’ve got the token, we can borrow a mutable reference to the corresponding client struct instance from the clients hash map:
let mut client = self.clients.get_mut(&token).unwrap();
And let’s call the read function that we’ve written above:
client.read();
In the end, we’ve got to reregister the client, because of oneshot():
event_loop.reregister(&client.socket, token, EventSet::readable(),
                      PollOpt::edge() | PollOpt::oneshot()).unwrap();
As you can see, it doesn’t differ much from a client registration routine; in essence, we’re just calling reregister instead of register.
Now we know about a client’s intent to initiate a WebSocket connection, and we should think about how to reply to such requests.
10 Handshake
Basically, we could send back just these headers:
HTTP/1.1 101 Switching Protocols
Connection: Upgrade
Upgrade: websocket
Except there’s one more important thing — the WebSocket protocol requires us to send a properly crafted Sec-WebSocket-Accept header as well. According to the RFC, there are certain rules: we need to get the Sec-WebSocket-Key header from a client, we need to append a long string to the key ("258EAFA5-E914-47DA-95CA-C5AB0DC85B11"), then hash the resulting string with the SHA-1 algorithm, and in the end encode the result in base64.
Rust doesn’t have SHA-1 and base64 in the standard library, but sure it does have them as separate libraries on crates.io, so let’s include them to our Cargo.toml:
[dependencies]
...
rustc-serialize = "0.3.15"
sha1 = "0.1.1"
rustc-serialize contains functions to encode binary data in base64, and sha1, obviously, is for SHA-1.
The actual function to encode the key is straightforward:
extern crate sha1;
extern crate rustc_serialize;

use rustc_serialize::base64::{ToBase64, STANDARD};

fn gen_key(key: &String) -> String {
    let mut m = sha1::Sha1::new();
    let mut buf = [0u8; 20];

    m.update(key.as_bytes());
    m.update("258EAFA5-E914-47DA-95CA-C5AB0DC85B11".as_bytes());

    m.output(&mut buf);

    return buf.to_base64(STANDARD);
}
We’re getting a reference to the key string as an argument for the gen_key function, creating a new SHA-1 hash, appending the key to it, then appending the constant as required by the RFC, and return the base64-encoded string as a result.
But to make use of this function we should capture the Sec-WebSocket-Key header first. To do that, let’s get back to the HTTP parser from the previous section. As you might remember, the ParserHandler trait allows us to define callbacks that get called whenever we receive new headers. Now is the right time to use this feature, so let’s improve the parser struct implementation:
use std::cell::RefCell;
use std::rc::Rc;

struct HttpParser {
    current_key: Option<String>,
    headers: Rc<RefCell<HashMap<String, String>>>
}

impl ParserHandler for HttpParser {
    fn on_header_field(&mut self, s: &[u8]) -> bool {
        self.current_key = Some(std::str::from_utf8(s).unwrap().to_string());
        true
    }

    fn on_header_value(&mut self, s: &[u8]) -> bool {
        self.headers.borrow_mut()
            .insert(self.current_key.clone().unwrap(),
                    std::str::from_utf8(s).unwrap().to_string());
        true
    }

    fn on_headers_complete(&mut self) -> bool {
        false
    }
}
The piece of code is simple, but it introduces a new important concept: shared ownership.
As you already know, in Rust we can have only one owner of a certain value, but sometimes we might need to share the ownership. For instance, in this case we need to scan a set of headers for a key while at the same time we’re collecting the headers in the parser handler. That means that we need to have 2 owners of the headers variable: in WebSocketClient and ParserHandler.

That’s where Rc comes to help: it’s a value wrapper with a reference counter, and in effect we’re moving the ownership of a value to the Rc container, so the Rc itself can be safely shared between many owners with the help of a special language trickery — we just clone() the Rc value when we need to share it, and the wrapper safely manages memory for us.
But here’s a caveat: the value Rc contains is immutable, i.e. because of the compiler constraints we can’t change it. In fact, it’s a natural consequence of Rust’s rules about mutability — it allows to have as many borrows of a variable as you want, but you can change the value only within a single borrow.
That’s not too convenient because we need to modify the list of headers as new data becomes available, and we’re pretty sure that we’re doing that only in one place, so no violations of Rust’s rules here — yet the Rc container wouldn’t allow us to modify its content.
Fortunately, RefCell fixes that — this is another special container type that allows us to overcome this limit with a mechanism called interior mutability. It simply means that we’re deferring all compiler checks to the run time as opposed to checking borrows statically, at compile time. So all that we need to do is to double-wrap our value in a (quite monstrous looking) Rc<RefCell<...>> container.
Let’s consider this code:
self.headers.borrow_mut()
    .insert(self.current_key.clone().unwrap(),
            ...
It corresponds to &mut borrow with the only difference that all checks for constrained number of mutatable borrows are performed dynamically, so it’s up to us to make sure that we’re borrowing the value only once.
Now, the actual owner of the headers variable would be the WebSocketClient struct, so let’s define the according properties there and write a new constructor function:
// Import the RefCell and Rc crates from the standard library
use std::cell::RefCell;
use std::rc::Rc;

...

struct WebSocketClient {
    socket: TcpStream,
    http_parser: Parser<HttpParser>,

    // Adding the headers declaration to the WebSocketClient struct
    headers: Rc<RefCell<HashMap<String, String>>>
}

impl WebSocketClient {
    fn new(socket: TcpStream) -> WebSocketClient {
        let headers = Rc::new(RefCell::new(HashMap::new()));

        WebSocketClient {
            socket: socket,

            // We're making a first clone of the `headers` variable
            // to read its contents:
            headers: headers.clone(),

            http_parser: Parser::request(HttpParser {
                current_key: None,

                // ... and the second clone to write new headers to it:
                headers: headers.clone()
            })
        }
    }

    ...
}
Now WebSocketClient can get access to parsed headers, and, consequently, we can read the header that interests us most, Sec-WebSocket-Key. Considering we have the key from a client, the response routine boils down to just sending an HTTP string that we combine out of several parts.
But as we can’t just send the data in the non-blocking environment, we need to switch the event loop to notify us when a client’s socket becomes available for a write.
The solution is to switch our event set to EventSet::writable() when we reregister the client’s socket.
Remember this line?
event_loop.reregister(&client.socket, token, EventSet::readable(),
                      PollOpt::edge() | PollOpt::oneshot()).unwrap();
We just need to store the set of events that interests us with the other client’s state, so let’s rewrite it this way:
struct WebSocketClient {
    socket: TcpStream,
    http_parser: Parser<HttpParser>,
    headers: Rc<RefCell<HashMap<String, String>>>,

    // Adding a new `interest` property:
    interest: EventSet
}
And, accordingly, let’s modify the “reregister” procedure:
event_loop.reregister(&client.socket, token,
                      client.interest, // Providing `interest` from the client's struct
                      PollOpt::edge() | PollOpt::oneshot()).unwrap();
The only thing left to do is to change the client’s interest value at certain places.
To make it more straightforward, let’s formalize the process of tracking the connection states:
#[derive(PartialEq)]
enum ClientState {
    AwaitingHandshake,
    HandshakeResponse,
    Connected
}
Here we define an enumeration that will describe all possible states for a WebSocket client. These three are simple: first, AwaitingHandshake means that we’re waiting for a handshake request in HTTP, HandshakeResponse represents the state when we’re replying to the handshake (again, talking in HTTP), and, after that, Connected indicates that we’ve started to communicate using the WebSocket protocol.
Let’s add the client state variable to the client struct:
struct WebSocketClient {
    socket: TcpStream,
    http_parser: Parser<HttpParser>,
    headers: Rc<RefCell<HashMap<String, String>>>,
    interest: EventSet,

    // Add a client state:
    state: ClientState
}
And modify the constructor, providing the initial state and interest:
impl WebSocketClient {
    fn new(socket: TcpStream) -> WebSocketClient {
        let headers = Rc::new(RefCell::new(HashMap::new()));

        WebSocketClient {
            socket: socket,
            ...
            // Initial events that interest us
            interest: EventSet::readable(),

            // Initial state
            state: ClientState::AwaitingHandshake
        }
    }
}
Now we can actually change the state in the read function. Remember these lines?
match self.socket.try_read(&mut buf) {
    ...
    Ok(Some(len)) => {
        if self.http_parser.is_upgrade() {
            // ...
            break;
        }
    }
}
Finally we can replace the placeholder in the is_upgrade() condition block with the state change code:
if self.http_parser.is_upgrade() {
    // Change the current state
    self.state = ClientState::HandshakeResponse;

    // Change current interest to `Writable`
    self.interest.remove(EventSet::readable());
    self.interest.insert(EventSet::writable());

    break;
}
After we’ve changed our interest to Writable, let’s add the required routines to reply to the handshake.
We’ll modify the ready function in our WebSocketServer handler implementation. The writing handler itself is simple, and we only need to separate incoming events.
fn ready(&mut self, event_loop: &mut EventLoop<WebSocketServer>,
         token: Token, events: EventSet) {
    // Are we dealing with the read event?
    if events.is_readable() {
        // Move all read handling code here
        match token {
            SERVER_TOKEN => { ... },
            ...
        }
        ...
    }

    // Handle write events that are generated whenever
    // the socket becomes available for a write operation:
    if events.is_writable() {
        let mut client = self.clients.get_mut(&token).unwrap();
        client.write();
        event_loop.reregister(&client.socket, token, client.interest,
                              PollOpt::edge() | PollOpt::oneshot()).unwrap();
    }
}
The remaining part is most simple — we need to build and send the response string:
use std::fmt;
...
impl WebSocketClient {
    fn write(&mut self) {
        // Get the headers HashMap from the Rc<RefCell<...>> wrapper:
        let headers = self.headers.borrow();

        // Find the header that interests us, and generate the key from its value:
        let response_key = gen_key(&headers.get("Sec-WebSocket-Key").unwrap());

        // We're using special function to format the string.
        // You can find analogies in many other languages, but in Rust it's performed
        // at the compile time with the power of macros. We'll discuss it in the next
        // part sometime.
        let response = fmt::format(format_args!("HTTP/1.1 101 Switching Protocols\r\n\
                                                 Connection: Upgrade\r\n\
                                                 Sec-WebSocket-Accept: {}\r\n\
                                                 Upgrade: websocket\r\n\r\n", response_key));

        // Write the response to the socket:
        self.socket.try_write(response.as_bytes()).unwrap();

        // Change the state:
        self.state = ClientState::Connected;

        // And change the interest back to `readable()`:
        self.interest.remove(EventSet::writable());
        self.interest.insert(EventSet::readable());
    }
}
Let’s test it by connecting to the WebSocket server from a browser. Open the dev console in your favorite web browser (press F12) and put this code there:
ws = new WebSocket('ws://127.0.0.1:10000');

if (ws.readyState == WebSocket.OPEN) {
    console.log('Connection is successful');
}
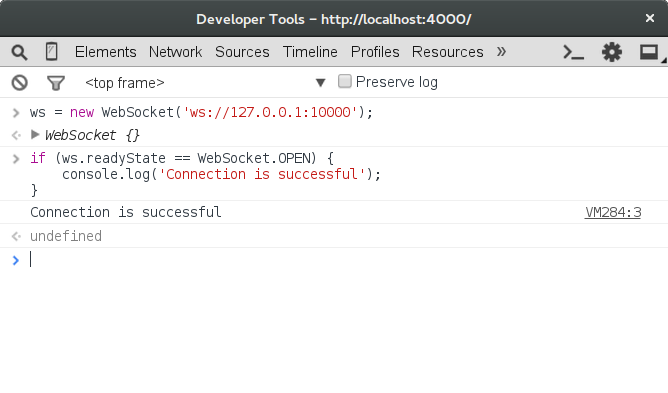
Looks like we’ve made it — the connection is successfully established!
Conclusion
Whew. That was a whirlwind tour of language features and concepts, but that’s just a start — be prepared for sequels to this article (of course, as lengthy and as boringly detailed as this one!). We have a lot more to cover: secure WebSockets, multithreaded event loop, benchmarking, and, of course, we still have to implement the communication protocol and write the actual application.
But before we get to the app, we might do further refactoring, separating the library code from the application, likely following with eventual publication of the resulting library to crates.io.
I suggest you to proceed to the next part.
All code for the part 1 is available on GitHub.
Discussions on Reddit: #1, #2, #3, #4.
Resources
- Journey to the Stack by Gustavo Duarte — a series of articles that provides a good insight on the inner implementation of the stack and stack frames. It’ll help you to better understand the Rust memory management principles.
- The Linux Programming Interface by Michael Kerrisk, 2010 — awesome book on the topic of using system APIs. Despite the title, applicable not only to Linux but to most *nix systems as well.
Comments
References
[1] Interestingly enough, Rust actually brings smart pointers to the language level: borrowing is based around ideas akin to C++’s unique_ptr and shared_ptr. ↑
[2] For instance, NASA JPL C Programming Coding Standard and MISRA C standard explicitly forbid dynamic memory allocation with malloc() and implies local variables allocation on the stack and usage of pre-allocated memory instead. ↑
[3] While basic garbage collection algos are relatively easy to implement, more smart approaches like concurrent GCs are very non-trivial. In fact, a sign of complexity is that Go getting concurrent GC only in version 1.5 — almost 3 years since the 1.0 release. ↑
[4] Strictly speaking, many implementations of malloc() and free() functions suffer from a similar overhead as well becase of fragmentation. More on that topic can be found in “Dynamic Memory Allocation and Fragmentation in C and C++” by Colin Walls. ↑
[5] “Graydon Hoare […] started working on a new programming language called Rust in 2006.” — InfoQ: “Interview On Rust” ↑
[6] According to pthread_create(3) manual page, it defaults to 2 MB on 32-bit Linux systems. ↑
[7] For comparison of epoll to other system APIs, refer to “Comparing and Evaluating epoll, select, and poll Event Mechanisms” by Louay Gammo, Tim Brecht, et al., University of Waterloo, 2004. ↑
[8] “Kqueue: A generic and scalable event notification facility” by Jonathan Lemon, FreeBSD Project. ↑
[9] “Inside Nginx: How We Designed For Performance Scale” by Owen Garrett. ↑
[10] General description on LinuxJournal.com. If you’re interested in more details, read “How TCP backlog works in Linux” by Andreas Veithen. ↑
Many thanks to:
Andrey Baksalyar for providing illustrations.
Vga for reading drafts and providing corrections.